 learndesign
Case study: a 3D revolve vase
Draw half a vase as a spline, spin it around its centre line with Revolve, then add a handle with Pipe. Three features, and the shape is all in the sketch.
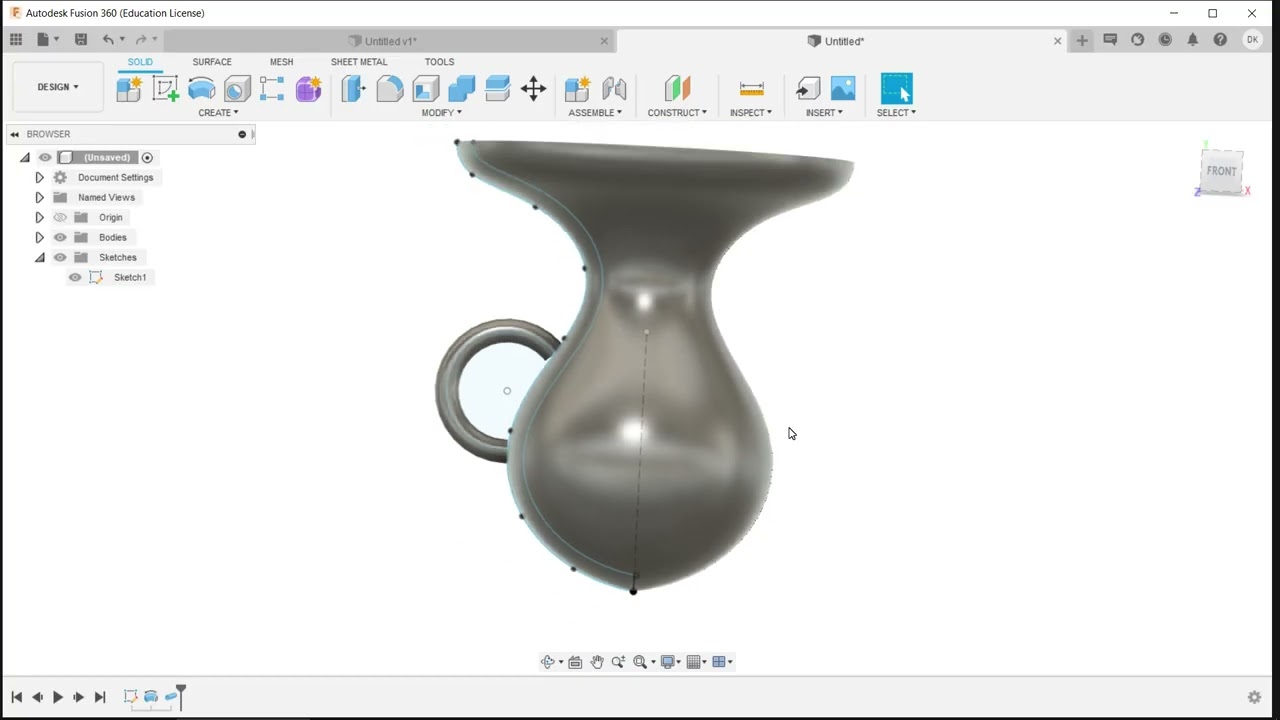
Anything round, like a vase, a bottle, a knob or a wheel, is a revolve. You draw half of the outline on one side of a centre line, and Fusion spins it a full turn to make the solid. The shape comes from the curve you draw, so this case study is mostly about drawing a good spline.
The profile
- New design, units in millimetres. Sketch on the front plane (XY), so the vase stands upright.
- Draw a vertical construction line up from the origin. This is the axis the vase spins around. Press X with the line selected to make it construction.
- Draw the outside of the vase with a Fit Point Spline: start at the bottom on the axis, work up through the belly and the neck, and finish at the lip. Five to eight points is plenty. More points make a lumpier curve, not a smoother one.
- Drag the points and the green tangent handles until the curve looks right from across the room. The narrow neck and the flared lip are what make it read as a vase and not a jar.
The wall
A solid revolve gives you a solid lump. For a vase with a wall and an opening at the top, select the spline and use Offset to make a parallel copy inside it, a few millimetres in. Close the shape with a short line across the lip and a line down the axis at the bottom, so there is one closed profile between the two curves. Leave the floor thick enough to stand on.
Revolve
Revolve (Create → Revolve). Profile: the closed shape between the curves. Axis: the construction line. Angle: 360°. It comes out as one body.
If Revolve won’t select your profile, the sketch is not closed. Look for a gap where the offset curve meets the lines across the lip or the floor, or a spline that crosses the axis.
Now edit the sketch and drag a spline point. The vase updates, because the solid is driven by the curve.
The handle: Pipe
- Sketch on the same front plane. Draw a circle or an arc beside the body where the handle should be, overlapping the body a little at both ends.
- Pipe (Create → Pipe). Path: the circle or arc. Section: Circular, and set the section size, around 8 to 10 mm for a handle you could grip.
- Operation Join, so the handle and the vase are one body.
Pipe sweeps a round cross-section along a path. It is the quick version of a Sweep when the section is a plain circle.
Finish
Press A and drag a ceramic or glazed appearance onto the body. Orbit it and look at the silhouette from the side; if the curve has a flat spot or a kink, go back to the spline.
Share it
Save the design, then use Share → Public link (the share icon at the top right of Fusion, or right-click the design in the Data panel). Turn the link on and copy it. Anyone with the link can orbit the model in a browser without Fusion.